Getting Started
This document walks you through how to set up TT-XLA. TT-XLA is a front end for TT-Forge that ingests JAX models via jit compile and PyTorch models through torch-xla, providing StableHLO (SHLO) graphs to the TT-MLIR compiler. TT-XLA leverages PJRT to integrate JAX, TT-MLIR and Tenstorrent hardware. Please see this blog post for more information about the PJRT project.
NOTE: If you encounter issues, please request assistance on the TT-XLA Issues page.
Prerequisites
1. Set Up the Hardware
- Follow the instructions for the Tenstorrent device you are using at: Hardware Setup
2. Install Software (choose one)
-
Option 1: Quick path: Use TT-Installer using: Software Installation
-
Option 2: Manual path: For more control, follow the manual software dependencies installation guide.
TT-XLA Installation Options
-
Option 1: Installing a Wheel and Running an Example
You should choose this option if you want to run models.
-
Option 2: Using a Docker Container to Run an Example
Choose this option if you want to keep the environment for running models separate from your existing environment.
-
Option 3: Building from Source
This option is best if you want to develop TT-XLA further. It's a more complex process you are unlikely to need if you want to stick with running a model.
Installing a Wheel and Running an Example
To install a wheel and run an example model, do the following:
Step 1. Install the Latest Wheel:
Download the latest wheel with pip.
pip install pjrt-plugin-tt --extra-index-url https://pypi.eng.aws.tenstorrent.com/
Run the tt-forge-install script to install missing system dependencies.
tt-forge-install
Step 2. Run some models:
Use wget to fetch each demo script into your current directory, and install packages with pip when noted.
MNIST (small CNN)
The mnist.py example runs a simple CNN on a Tenstorrent device and compares the output against a CPU reference.
wget https://raw.githubusercontent.com/tenstorrent/tt-xla/main/examples/pytorch/mnist.py
python mnist.py
You should see the model output and a PCC (Pearson Correlation Coefficient) check confirming the TT device output matches the CPU reference.
Tiny Llama (Hugging Face transformers)
The tiny_llama_demo.py example in the TT-Forge repo loads a small LLM from Hugging Face, compiles it with torch.compile(..., backend="tt"), and prints top-token predictions. You must download the script and install transformers (and its dependencies); the wheel install in Step 1 does not include them. The first run also downloads model weights from Hugging Face over the network.
wget https://raw.githubusercontent.com/tenstorrent/tt-forge/main/demos/tt-xla/nlp/pytorch/tiny_llama_demo.py
pip install transformers
python tiny_llama_demo.py
You should see the prompt "The capital of France is", the predicted next token, the probability it will occur, and a list of other ranked options that could follow instead, for example:
Prompt: `The capital of France is`
Top prediction: `Paris`

Rank   Token           Probability
-----------------------------------
1      'Paris'         36.9141%
2      'located'       10.0098%
3      'the'           8.8867%
4      'a'             4.2480%
5      'in'            2.5391%
Using a Docker Container to Run an Example
This section walks through the installation steps for using a Docker container for your project.
- Prerequisite: Docker must be installed. See the official Docker installation guide if needed.
Step 1. Run the Docker container:
docker run -it --rm \
--device /dev/tenstorrent \
-v /dev/hugepages-1G:/dev/hugepages-1G \
ghcr.io/tenstorrent/tt-xla-slim:latest
NOTE: You cannot isolate devices in containers. You must pass through all devices even if you are only using one. You can do this by passing
--device /dev/tenstorrent. Do not try to pass--device /dev/tenstorrent/1or similar, as this type of device-in-container isolation will result in fatal errors later on during execution.
-
If you want to check that it is running, open a new tab with the Same Command option and run the following:
docker ps
Step 2: Running Models in Docker
Use wget to fetch each demo script into your current directory, and install packages with pip when noted.
MNIST (small CNN)
The mnist.py example runs a simple CNN on a Tenstorrent device and compares the output against a CPU reference.
wget https://raw.githubusercontent.com/tenstorrent/tt-xla/main/examples/pytorch/mnist.py
python mnist.py
You should see the model output and a PCC (Pearson Correlation Coefficient) check confirming the TT device output matches the CPU reference.
Tiny Llama (Hugging Face transformers)
The tiny_llama_demo.py example in the TT-Forge repo loads a small LLM from Hugging Face, compiles it with torch.compile(..., backend="tt"), and prints top-token predictions. You must download the script and install transformers (and its dependencies); the slim image does not include them. The first run also downloads model weights from Hugging Face over the network.
wget https://raw.githubusercontent.com/tenstorrent/tt-forge/main/demos/tt-xla/nlp/pytorch/tiny_llama_demo.py
pip install transformers
python tiny_llama_demo.py
You should see the prompt "The capital of France is", the predicted next token, the probability it will occur, and a list of other ranked options that could follow instead, for example:
Prompt: `The capital of France is`
Top prediction: `Paris`

Rank   Token           Probability
-----------------------------------
1      'Paris'         36.9141%
2      'located'       10.0098%
3      'the'           8.8867%
4      'a'             4.2480%
5      'in'            2.5391%
Building from Source
Install from source if you are a developer who wants to develop for TT-XLA.
Step 1: Prerequisites
-
TT-XLA has the following system dependencies:
- Ubuntu 24.04
- Python 3.12
- python3.12-venv
- Clang 20
- GCC 13
- Ninja
- CMake 4.0.3
-
TT-XLA additionally requires the following libraries:
sudo apt install protobuf-compiler libprotobuf-dev
sudo apt install ccache
sudo apt install libnuma-dev
sudo apt install libhwloc-dev
sudo apt install libboost-all-dev
sudo apt install libnsl-dev
Step 2: Building the TT-MLIR Toolchain
-
Before compiling TT-XLA, the TT-MLIR toolchain needs to be built:
- Clone the tt-mlir repo.
- Follow the TT-MLIR build instructions to set up the environment and build the toolchain.
-
After building the toolchain, set the following environment variables:
| Variable | Required | Description |
|---|---|---|
TTMLIR_TOOLCHAIN_DIR | Yes | Path to TT-MLIR toolchain (e.g., /opt/ttmlir-toolchain/) |
TTXLA_LOGGER_LEVEL | No | Set to DEBUG or VERBOSE for detailed logs |
Step 3: Building TT-XLA
Make sure you are not in the TT-MLIR build directory, and you are in the location where you want TT-XLA to install.
-
Clone TT-XLA:
git clone https://github.com/tenstorrent/tt-xla.git -
Navigate into the TT-XLA folder:
cd tt-xla -
Initialize third-party submodules:
git submodule update --init --recursive -
Run the following set of commands to build TT-XLA (this will build the PJRT plugin and install it into
venv):source venv/activate cmake -G Ninja -B build # -DCMAKE_BUILD_TYPE=Debug in case you want debug build cmake --build build -
To verify that everything is working correctly, run the following command:
python -c "import jax; print(jax.devices('tt'))"The command should output all available TT devices, e.g.
[TTDevice(id=0, arch=Wormhole_b0)] -
(optional) If you want to build the TT-XLA wheel, run the following command:
cd python_package
python setup.py bdist_wheel
The above command outputs a
python_package/dist/pjrt_plugin_tt*.whlfile which is self-contained. To install the created wheel, run:pip install dist/pjrt_plugin_tt*.whlThe wheel has the following structure:
pjrt_plugin_tt/                     # PJRT plugin package
   |-- __init__.py
   |-- pjrt_plugin_tt.so               # PJRT plugin binary
   |-- tt-metal/                       # tt-metal runtime dependencies (kernels, riscv compiler/linker, etc.)
   `-- lib/                            # shared library dependencies (tt-mlir, tt-metal)
jax_plugin_tt/                      # Thin JAX wrapper
   `-- __init__.py                     # imports and sets up pjrt_plugin_tt for XLA
torch_plugin_tt                     # Thin PyTorch/XLA wrapper
   `-- __init__.py                     # imports and sets up pjrt_plugin_tt for PyTorch/XLA
It contains a custom Tenstorrent PJRT plugin (
pjrt_plugin_tt.so) and its dependencies (tt-mlirandtt-metal). Additionally, there are thin wrappers for JAX (jax_plugin_tt) and PyTorch/XLA (torch_plugin_tt) that import the PJRT plugin and set it up for use with the respective frameworks.
Testing
The TT-XLA repo contains various tests in the tests directory. To run an individual test, pytest -svv is recommended in order to capture all potential error messages down the line. Multi-chip tests can be run only on specific Tenstorrent hardware, therefore these tests are structured in folders named by the Tenstorrent cards/systems they can be run on. For example, you can run pytest -v tests/jax/multi_chip/n300 only on a system with an n300 Tenstorrent card. Single-chip tests can be run on any system with the command pytest -v tests/jax/single_chip.
Common Build Errors
- Building TT-XLA requires
clang-20. Please make sure thatclang-20is installed on the system andclang/clang++links to the correct version of the respective tools. - Please also see the TT-MLIR docs for common build errors.
Pre-commit
Pre-commit applies a git hook to the local repository such that linting is checked and applied on every git commit action. Install it from the root of the repository using:
source venv/activate
pre-commit install
If you have already committed something locally before installing the pre-commit hooks, you can run this command to check all files:
pre-commit run --all-files
For more information please visit pre-commit.
Where to Go Next
- Try more examples in the TT-XLA examples directory
- Learn about Improving Model Performance
- Explore Code Generation to convert models into standalone code
Breaking Into the Source With a Debugger
This page explains how to debug the native source code of the PJRT plugin.
Prerequisites
- Clone and build the TT-XLA project.
- The build has to be of the
Debugtype, e.g.-DCMAKE_BUILD_TYPE=Debug. - This is needed for native binaries to have debug symbols.
- The build has to be of the
- Verify
gdbis installed by runninggdb --version.- Needed for debugging of native code.
- This guide is scoped to Visual Studio Code only.
- Install "C/C++" (by Microsoft) and "Python" (by Microsoft) VS Code extensions.
- "Python" will auto-install the "Python Debugger" extension as well.
- "Python Debugger" extension enables
debugpydebugging.
- Create an empty
launch.jsonfile.- In the repository root, create a
.vscode/directory (note that this directory is ignored bygit). - Create a new file
.vscode/launch.jsonwith the following JSON content:
This file is used for configuring multiple debugging profiles.{ "version": "0.2.0", "configurations": [] }
- In the repository root, create a
Debugging Python Integration Tests
How to run a Python script or test in debugpy
Create a new debugging profile called Python: Current File in launch.json:
{
  "version": "0.2.0",
  "configurations": [
    { // Python: Current File
        "name": "Python: Current File",
        "type": "debugpy",
        "request": "launch",
        "program": "${file}",
        "console": "integratedTerminal",
        "justMyCode": false
    }
  ]
}
Verify that the profile works:
- Create a new Python script and set a breakpoint in VS Code.
- Run a VS Code command
Debug: Select and Start Debuggingand select thePython: Current Fileprofile while the Python script tab is open. - Validate that the breakpoint will be hit.
Now, replace the Python: Current File with a new profile for running tests,
PyTest: Current File:
{
  "version": "0.2.0",
  "configurations": [
    { // PyTest: Current File
      "name": "PyTest: Current File",
      "type": "debugpy",
      "request": "launch",
      "module": "pytest",
      "args": [
        "-s",
        "${file}"
      ],
      "console": "integratedTerminal",
      "justMyCode": false
    }
  ]
}
Verify that this profile works:
- Make sure
venvis activated andgitsubmodules are initialized. - Open a Python test from the
tests/directory and set a breakpoint. - Run the new
PyTest: Current Fileprofile and validate that the breakpoint will be hit.
How to attach gdb to a running PJRT client
Since running Python tests is the most common way to also test the PJRT plugin, and because it is common to debug Python and native code side-by-side, this section will focus on that scenario. However, this step can be applied to any running process, assuming you have the time to attach the debugger to the process before it exits.
First, create a new debugging profile Native: Attach to PJRT Client
in launch.json:
{
  "version": "0.2.0",
  "configurations": [
    { // PyTest: Current File (from previous section)
    },
    { // Native: Attach to PJRT Client
      "name": "Native: Attach to PJRT Client",
      "type": "cppdbg",
      "request": "attach",
      "program": "${workspaceFolder}/venv/bin/python",
      "processId": "${command:pickProcess}",
      "MIMode": "gdb",
      // pjrt_plugin_tt.so is in this location
      "additionalSOLibSearchPath": "${workspaceFolder}/build/pjrt_implementation/src"
    },
  ]
}
Verify that this profile works:
- Make sure
venvis activated andgitsubmodules are initialized. - Select a Python test to run from the
tests/directory and set a breakpoint at the beginning of the test. - Run the
PyTest: Current Filedebugging profile and wait fordebugpyto break into the Python code.- At this point, the process running the test is stalled, and you have time
to attach
gdbto the process.
- At this point, the process running the test is stalled, and you have time
to attach
- Open a C++ file that you wish to debug, and put a breakpoint where you
wish to break. For exercise, almost all tests should pass through
ClientInstance::initialize. - Run the
Native: Attach to PJRT Clientdebugging profile without stopping the existingPyTest: Current Fileprofile (that would kill the test driver process), which will prompt you to select which process you want to attach to. Select thepytestprocess that is running your test. Note that when you are in a remote SSH workspace session you will see multiple options, and you need to pick the remote one (the server). - Resume execution of the
PyTest: Current Fileprofile to unblock the Python interpreter, and wait for the breakpoint in C++ code to be hit in theNative: Attach to PJRT Clientdebugger session. - Once the breakpoint is hit, you can debug the native PJRT code.
Debugging PJRT Unit Tests
Create a new debugging profile called GTest: Filter and Run Tests in
launch.json:
{
  "version": "0.2.0",
  "configurations": [
    { // GTest: Filter and Run Tests
      "name": "GTest: Filter and Run Tests",
      "type": "cppdbg",
      "request": "launch",
      "program": "${workspaceFolder}/build/tests/pjrt/TTPJRTTests",
      "args": [
        "--gtest_filter=${input:gtestFilter}"
      ],
      "stopAtEntry": false,
      "cwd": "${workspaceFolder}",
      "environment": [],
      "externalConsole": false,
      "MIMode": "gdb",
    }
  ],
  "inputs": [
    {
      "id": "gtestFilter",
      "type": "promptString",
      "description": "Enter gtest filter (e.g., TestSuite.TestName or TestSuite.* for all tests in a suite)",
      "default": "*"
    }
  ]
}
Verify that this profile works:
- Set a breakpoint in one of the PJRT unit tests.
- Run the
GTest: Filter and Run Testsdebugging profile and enter a filter that matches the test (e.g.*TestName*). - Once the breakpoint is hit, you can start debugging the test. Note that you can debug multiple tests within the same session, as long as they match the given filter.
Improving Model Performance
This guide covers best practices and techniques for optimizing the performance of PyTorch models running on single chip Tenstorrent hardware using the tt-xla frontend of the forge compiler.
Overview
- Optimization Levels - Compiler optimization levels (0, 1, 2) to balance compile and runtime performance
- Device Warmup - Eliminate first-run overhead by performing warmup iterations
- Data Formats - Use bfloat16 and bfloat8_b for faster computation and reduced memory usage, including manual mixed precision via per-tensor weight dtype overrides
- Runtime Trace - Reduce host-device communication overhead by recording and replaying command sequences
- Batch Size Tuning - Find the optimal batch size to maximize throughput for your model
For a complete working example, see the code below from examples/pytorch/mnist_performant.py, which demonstrates all these optimizations together.
Mnist performant example:
{{#include ../../examples/pytorch/mnist_performant.py}}
Let's break down each performance optimization in detail.
1. Optimization Levels
The optimization_level compiler option controls multiple optimization passes from tt-mlir in a coordinated way. tt-xla offers three levels (0, 1, 2).
To set the optimization level, use:
torch_xla.set_custom_compile_options({
    "optimization_level": 1,
})
Optimization Levels Breakdown
Level 0 (Default)
- All MLIR optimizer passes disabled
- All tensors in DRAM
- Use for: Iterating fast, safest option
- Compilation time: Fastest
- Runtime performance: Slowest
Level 1 (Recommended)
- Basic optimizations enabled
- Const-eval of Conv2D weights preprocessing and fusion patterns
- All tensors in DRAM
- Use for: General model compilation, good balance
- Compilation time: Moderate
- Runtime performance: Good
Level 2
- Advanced optimizations enabled, all level 1 plus:
- Maximize number of tensors to put in SRAM instead of DRAM
- Use for: Maximum performance
- Compilation time: Slower (one-time cost)
- Runtime performance: Best
2. Device Warmup
Run at least 3 dummy iterations before measuring performance:
# Warmup iterations.
with torch.no_grad():
    for _ in range(3):
        output = model(input)
Why Warmup is Necessary
The first iteration is extremely slow due to it running:
- Model compilation and optimization
- Op kernel compilation
- Transferring of model weights to device
- Const-eval of model weight and constants
- Caching of op kernels on device
The second iteration is needed for:
- Capturing runtime trace to reduce op dispatch overhead (Section 4)
All of the above is a one time fixed cost and all subsequent iterations of the model will be orders of magnitude faster.
3. Data Formats
TT Hardware supports multiple lower precision data formats (docs). For use through tt-xla try the following:
- bfloat16
- bfloat8_b
bfloat16
To use bfloat16, convert your model in pytorch before compiling:
# Convert model weights and operations to bfloat16.
model = model.to(dtype=torch.bfloat16)
Ensure your input tensors match the model's data type:
inputs = inputs.to(torch.bfloat16)
bfloat16 (Brain Floating Point 16-bit) provides:
- Faster computation compared to fp32
- Reduced memory usage (50% of fp32)
- Better utilization on TT hardware
- Minimal to no accuracy loss for most workloads
bfloat8_b
Enable bfp_bf8 weight conversion using compile options. The model MUST be cast to bfloat16 before compilation.
torch_xla.set_custom_compile_options({
    "experimental_weight_dtype": "bfp_bf8",  # Cast matmul weights to bfloat8_b
})
bfloat8_b (Block Float 8-bit) weight conversion casts matmul weights to bfp_bf8 format, providing faster computation and reduced memory usage.
Notes
- Possibility of accuracy loss for some workloads
- Verify output: Check that accuracy is acceptable for your use case
- Automatic conversion: Weights are automatically converted during compilation
- Not always beneficial: Profile your specific model to verify improvement
Per-Tensor Weight Dtype Overrides (Manual Mixed Precision)
When uniform weight conversion causes accuracy degradation in specific layers, you can override dtypes on a per-tensor basis. This lets you keep sensitive layers at higher precision (e.g. bf16) while converting the rest to a lower format (e.g. bfp_bf8 or bfp_bf4).
Pass a dict mapping parameter names to target dtypes to apply_weight_dtype_overrides():
from tt_torch import apply_weight_dtype_overrides

# Override specific weights by name (glob patterns supported).
apply_weight_dtype_overrides(model, {
    "fc2.weight": "bfp_bf8",
})
Call this after creating the model and before torch.compile. See examples/pytorch/mnist_performant.py for a complete working example.
Note: Currently only matmul/linear layer weight overrides are supported. Convolution weights on lower data types are not yet supported through the compiler.
For more advanced usage including JSON configs, the tt-gen-weight-template CLI, and implementation details, see Mixed Precision.
4. Runtime Trace
What is Runtime Trace?
Runtime tracing is a performance optimization that eliminates some of the host to device communication by recording the commands for dispatching operations and replaying these as a single command when executing a trace.
How to Enable
Step 1: Set environment variable before importing torch_xla:
import os
os.environ["TT_RUNTIME_TRACE_REGION_SIZE"] = "10000000"  # ~10MB
Step 2: Enable trace in compiler options:
torch_xla.set_custom_compile_options({
    "enable_trace": "true",
})
Requirements
TT_RUNTIME_TRACE_REGION_SIZEshould be set (recommended:"10000000"or 10MB)- The trace region size determines how much memory is allocated in DRAM for storing the trace. Adjust based on your model.
- If you see trace-related errors, try increasing this value.
5. Batch Size Tuning
Batch size impacts:
- Throughput (samples/second) - larger batches typically (not always) increase throughput
- Latency (time per sample) - larger batches increase per-sample latency
- Memory usage - larger batches require more device memory
Tuning Process
- Typical values to start with (e.g., 1, 2, 4, 8, 16, 32)
- Measure throughput for each batch size
- Increase batch size until:
- Throughput plateaus or starts decreasing
- Sometimes smaller batches can use SRAM much more effectively, leading to an overall greater throughput than using bigger batches
- Memory is exhausted (OOM error)
- Throughput plateaus or starts decreasing
Mixed Precision (Per-Tensor Weight Dtype Overrides)
When uniform weight conversion (e.g. experimental_weight_dtype: "bfp_bf8") causes accuracy degradation in specific layers, you can specify dtype overrides on a per-tensor basis. This lets you keep sensitive layers at higher precision (e.g. bf16) while converting the rest to a lower format (e.g. bfp_bf8 or bfp_bf4).
Note: Currently only matmul/linear layer weight overrides are propagated and respected. Convolution weights on lower data types are not yet supported through the compiler.
Method 1: Python dict (recommended)
Build a dict mapping parameter names (or glob patterns) to target dtypes and call apply_weight_dtype_overrides():
from tt_torch import apply_weight_dtype_overrides

# Override specific weights by name.
apply_weight_dtype_overrides(model, {
    "fc2.weight": "bfp_bf8",
})

# Or use glob patterns to target groups of layers.
apply_weight_dtype_overrides(model, {
    "model.layers.*.mlp.gate_proj.weight": "bfp_bf4",
    "model.layers.*.mlp.up_proj.weight": "bfp_bf4",
    "model.layers.0.self_attn.q_proj.weight": "bf16",
})

# A "default" key applies to all weights, with specific overrides taking precedence.
apply_weight_dtype_overrides(model, {
    "default": "bfp_bf8",
    "model.layers.0.self_attn.q_proj.weight": "bf16",
})
Call this after creating the model and before torch.compile. See examples/pytorch/mnist_performant.py for a complete working example that lowers the last linear layer weight to bfp_bf8.
Method 2: JSON config + CLI
For large models with hundreds of weight parameters, use the tt-gen-weight-template CLI to generate a JSON template, then edit it:
tt-gen-weight-template --loader third_party/tt_forge_models/llama/causal_lm/pytorch/loader.py
CLI options:
| Option | Description |
|---|---|
--loader | (Required) Path to a model loader.py file |
--variant | Variant enum name (e.g. LLAMA_3_1_8B). Defaults to the loader's DEFAULT_VARIANT |
--list-variants | List available variants and exit |
--default-dtype | Default dtype for all entries: bfp_bf8 (default), bfp_bf4, or bf16 |
--output-dir | Override output directory (default: mixed_precision_configs/ next to the loader) |
--auto-class | transformers Auto* class to use (default: AutoModelForCausalLM) |
The output is a JSON file mapping every weight parameter to a dtype string. Edit it to fine-tune per-layer dtypes:
{
    "model.layers.*.mlp.gate_proj.weight": "bfp_bf4",
    "model.layers.*.mlp.up_proj.weight": "bfp_bf4",
    "model.layers.0.self_attn.q_proj.weight": "bf16"
}
Then pass the JSON file path to apply_weight_dtype_overrides():
apply_weight_dtype_overrides(model, "path/to/config.json")
Auto-discovery for tests and benchmarks: JSON configs placed in mixed_precision_configs/ next to the model's loader.py are automatically discovered by the model test runner (tests/runner/test_models.py) and LLM benchmarks (tests/benchmark/benchmarks/llm_benchmark.py).
In-model annotation
If you control the model code, you can annotate weights directly in the forward pass using torch.ops.tt.weight_dtype_override:
def forward(self, x):
    w = torch.ops.tt.weight_dtype_override(self.fc.weight, "bfp_bf8")
    return torch.matmul(x, w)
This is useful for custom models or when you need dtype overrides to interact with other operations (e.g. tensor-parallel sharding). In practice this is rarely needed — the dict and JSON methods above cover most use cases.
How it works
Overrides are applied transparently via torch.nn.utils.parametrize — there is no need to edit model forward functions or manually insert custom ops (unless using in-model annotation). The apply_weight_dtype_overrides() function registers a parametrization on each matched weight that injects a torch.ops.tt.weight_dtype_override call. During compilation, a C++ frontend pass extracts these annotations and propagates them as per-argument attributes for the tt-mlir weight dtype conversion pass.
Note: If
apply_weight_dtype_overrides()is called multiple times on the same model (e.g. first with a dict, then with a JSON config), the first call has priority for any given weight — already-parametrized weights are not overridden by subsequent calls.
Test Infra
Test infra consists of main "tester" classes and a few helper ones. Its main goal is making test writing easy.
Here is a brief class diagram of the infra:
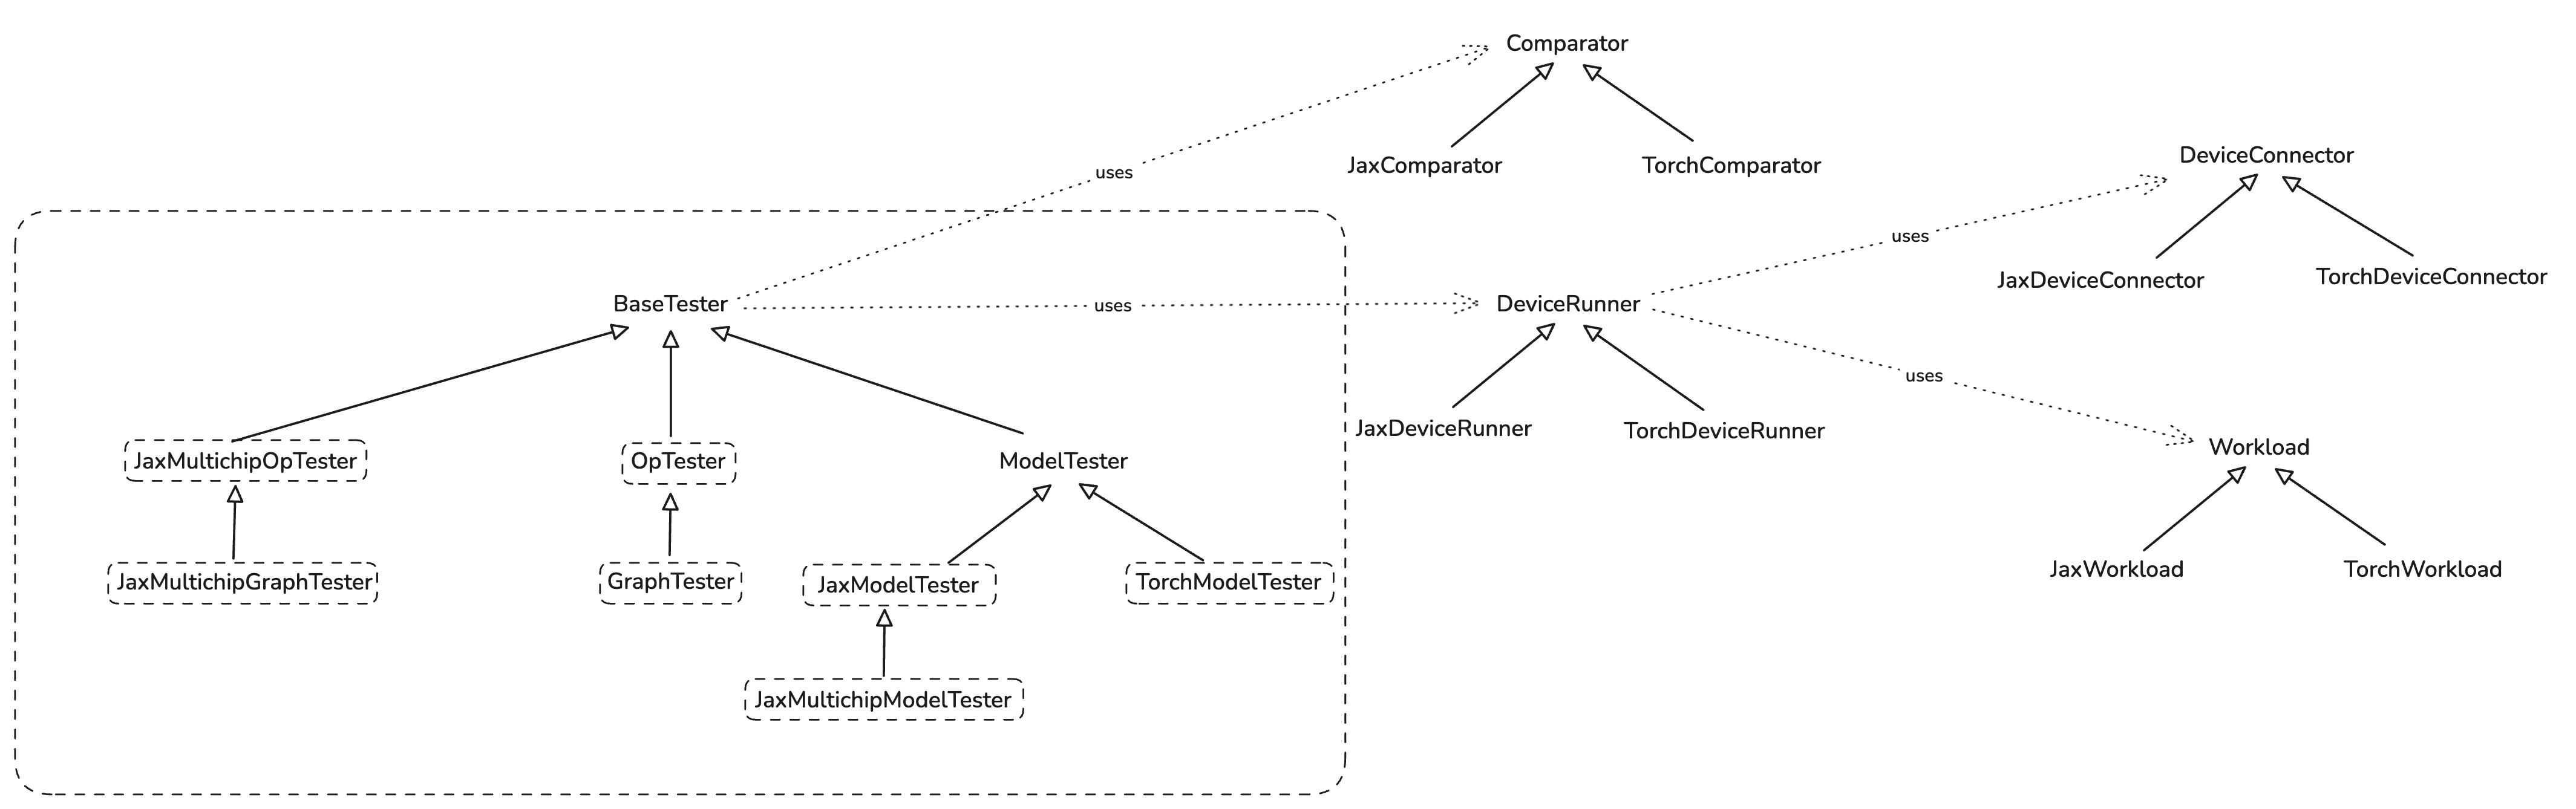
Op and Graph Tests
Op tester exposes easy to use functions:
run_op_test(...)
run_op_test_with_random_inputs(...)
They wrap the instantiation of the OpTester and all the underlying complexity. User just need to
pass the op (python function) they want to test to one of these functions like this:
def test_add(x_shape: tuple, y_shape: tuple):
    def add(x: jax.Array, y: jax.Array) -> jax.Array:
        return jnp.add(x, y)

    run_op_test_with_random_inputs(add, [x_shape, y_shape])
and that's it.
GraphTester is at the moment identical to OpTester, and it too exposes
run_graph_test(...)
run_graph_test_with_random_inputs(...)
which are meant to be used in the same way as for op tests.
Model Tests
Models are tested by inheriting one of *ModelTester classes and overriding required methods.
Please read docstring of appropriate class you want to inherit for more information.
Jax Model Example
First, you define a model:
class MNISTMLPModel(nn.Module):
    hidden_sizes: tuple[int]

    @nn.compact
    def __call__(self, x: jax.Array):
        x = x.reshape((x.shape[0], -1))

        for h in self.hidden_sizes:
            x = nn.Dense(features=h)(x)
            x = nn.relu(x)

        x = nn.Dense(features=10)(x)
        x = nn.softmax(x)

        return x
Then you define a tester by inheriting JaxModelTester:
class MNISTMLPTester(JaxModelTester):
    def __init__(
        self,
        hidden_sizes: Sequence[int],
        comparison_config: ComparisonConfig = ComparisonConfig(),
        run_mode: RunMode = RunMode.INFERENCE,
    ) -> None:
        self._hidden_sizes = hidden_sizes
        super().__init__(comparison_config, run_mode)

    # @override
    def _get_model(self) -> nn.Module:
        return MNISTMLPModel(self._hidden_sizes)

    # @override
    def _get_forward_method_name(self) -> str:
        return "apply"

    # @override
    def _get_input_activations(self) -> Sequence[jax.Array]:
        key = jax.random.PRNGKey(37)
        img = jax.random.normal(key, (4, 28, 28, 1))  # B, H, W, C
        # Channels is 1 as MNIST is in grayscale.
        return img

    # @override
    def _get_forward_method_args(self):
        inp = self._get_input_activations()
        parameters = self._model.init(jax.random.PRNGKey(42), inp)
        return [parameters, inp]
Finally, you run the test:
@pytest.fixture
def inference_tester(request) -> MNISTMLPTester:
    return MNISTMLPTester(request.param)

@pytest.mark.parametrize(
    "inference_tester", [(256, 128, 64)], indirect=True, ids=lambda val: f"{val}"
)
def test_mnist_mlp_inference(inference_tester: MNISTMLPTester):
    inference_tester.test()
Serialization and FileCheck
Serializing IR to Disk
To serialize compilation artifacts (MLIR, TTNN IRs) to disk, use the --serialize flag:
pytest path/to/test.py::test_name --serialize
Your test must pass the request fixture for serialization to work:
For op/graph tests:
def test_my_op(request):
    run_op_test(MyOp(), [torch.randn(32, 32)], request=request)
For model tests:
def test_my_model(model_tester: MyModelTester, request):
    model_tester.test(request=request)
Artifacts are written to output_artifact/<sanitized_test_name>/.
Running FileCheck
To verify IR transformations, use the @pytest.mark.filecheck decorator:
@pytest.mark.filecheck(["add.ttnn.mlir", "matmul_fusion.ttir.mlir"])
def test_my_op(request):
    run_op_test(MyOp(), [torch.randn(32, 32)], request=request)
FileCheck automatically serializes artifacts, runs pattern matching, and fails on mismatches.
For pattern file syntax and conventions, see tests/filecheck/filecheck.md.
Fusing and Composite Ops
When PyTorch models are compiled through torch.compile("tt"), high-level operations like RMSNorm or GELU are typically decomposed by XLA into many primitive ops. TT-XLA addresses this with two different mechanisms:
- Composite Ops: a StableHLO-level mechanism that gives us option to wrap high-level ops (for example
tenstorrent.rms_norm) and preserve them as single ops in TT-MLIR. - Torch FX Fusing: a graph-rewrite mechanism that pattern-matches multi-op FX subgraphs and rewrites them into standard torch ops (for example
torch.nn.functional.rms_norm).
These mechanisms are different, but they are designed to work together. In practice, fusing is only useful because composites exist: fusion rewrites user code into composite-eligible ops, and composites are what preserve that intent through decomposition so TT-MLIR can lower it to optimized TTNN operations. There is also an advanced MLIR-level fusing system in the tt-mlir repo, covered briefly at the end.
Compilation Pipeline Overview
The following diagram shows where fusing and composite ops fit in the compilation pipeline:
PyTorch Model
  |
  v
Torch compilation
  |
  v
FX Graph (torch.fx.GraphModule)
  |
  v
run_fusion_passes()          <-- Torch FX Fusing
  |                               Detects multi-op patterns (e.g. LlamaRMSNorm)
  |                               and replaces them with standard torch ops
  v                               (e.g. torch.nn.functional.rms_norm)
handle_composite_ops()       <-- Composite Wrapping
  |                               Wraps known torch ops with StableHLO
  |                               composite markers (e.g. tenstorrent.rms_norm)
  v
torch.export + torch decompositions  <-- Wrapped composites survive decomposition
  |
  v
torch to hlo conversions  <-- Wrapped composites survive decomposition
  |
  v
StableHLO
  |
  v
TTIR legalization     <-- TT-MLIR recognizes wrapped composites
  |
  v
TTNN -> Hardware
Configuration Options
Both Torch FX Fusing and Composite Ops can be toggled via torch.compile options:
| Option | Default | Description |
|---|---|---|
tt_enable_torch_fx_fusion_pass | True | Enable/disable Torch FX fusion pattern matching |
tt_enable_composite_ops | True | Enable/disable composite op wrapping |
Example usage:
import torch

model = MyModel()
input = torch.randn(1, 32, 768)

# Enable both (default)
compiled = torch.compile(model, backend="tt")

# Disable fusion, keep composites
compiled = torch.compile(model, backend="tt", options={
    "tt_enable_torch_fx_fusion_pass": False,
    "tt_enable_composite_ops": True,
})

# Disable both (useful for debugging)
compiled = torch.compile(model, backend="tt", options={
    "tt_enable_torch_fx_fusion_pass": False,
    "tt_enable_composite_ops": False,
})
Fusion + Composites: Working Together
The two systems are designed to chain together. Fusion converts arbitrary user implementations into standard torch ops, and composites wrap those standard ops for the compiler.
Here is a concrete walkthrough using LlamaRMSNorm:
Step 1: User's LlamaRMSNorm model code
  hidden_states = hidden_states.to(float32)
  variance = hidden_states.pow(2).mean(-1, keepdim=True)
  hidden_states = hidden_states * torch.rsqrt(variance + eps)
  return weight * hidden_states.to(input_dtype)

Step 2: run_fusion_passes() — RMSNormFusionProvider matches this pattern
  → Replaced with: torch.nn.functional.rms_norm(hidden_states, weight.shape, weight, eps)

Step 3: handle_composite_ops() — rms_norm is in the replacements dict
  → Wrapped as: composite_rms_norm(hidden_states, weight.shape, weight, eps)
  → In the FX graph, this creates StableHLO composite markers around rms_norm

Step 4: torch.export + torch decompositions
  → Wrapped composites survive decomposition as "tenstorrent.rms_norm"

Step 5: torch to hlo conversions
  → Wrapped composites survive decomposition as "tenstorrent.rms_norm"

Step 6: TTIR legalization
  → Recognized and lowered to optimized TTIR rms_norm op
  → Compiled to TTNN and executed on hardware
Without fusion, users who write their own RMSNorm implementation rather than calling torch.nn.functional.rms_norm directly (e.g. LlamaRMSNorm in huggingface transformers), would not benefit from the composite optimization. The fusion pass bridges this gap.
Composite Ops
What Are Composite Ops
StableHLO composite ops are a mechanism for wrapping a sequence of operations and giving them a name that custom backends can recognize.
TT-XLA uses the naming convention tenstorrent.<op_name> (e.g., tenstorrent.gelu, tenstorrent.rms_norm, tenstorrent.layer_norm). When these composites reach TT-MLIR, the LegalizeStableHLOCompositeToTTIR pass recognizes them and maps them to optimized TTIR operations.
How They Work
Each composite op follows a 3-step pattern using StableHLOCompositeBuilder:
- Mark inputs — call
builder.mark_inputs(...)on the input tensors - Run the original op — call the standard torch op
- Mark outputs — call
builder.mark_outputs(...)on the result
Here is composite_gelu example. View full source
def composite_gelu(input: Tensor, approximate: str = "none") -> Tensor:
    """
    Creates composite gelu operation for torch xla using StableHLOCompositeBuilder.
    Note that operation name must be tenstorrent.gelu[_tanh] for MLIR to handle it.

    Returns a tensor.
    """
    tanh = approximate == "tanh"
    name = "tenstorrent.gelu" + ("_tanh" if tanh else "")
    attr = {"approximate": "tanh"} if tanh else None

    builder = StableHLOCompositeBuilder(name=name, attr=attr)

    input = builder.mark_inputs(input)
    input = torch.nn.functional.gelu(input, approximate=approximate)
    input = builder.mark_outputs(input)
The name parameter becomes the composite name in StableHLO (e.g., tenstorrent.gelu). The attr dictionary passes metadata attributes to the compiler (e.g., epsilon value).
The Replacements Dictionary
The replacements dictionary in composite_ops.py maps torch functions and module types to their composite implementations:
def composite_topk_values(
    input: Tensor,
    k: int,
    dim: int = -1,
    largest: bool = True,
    sorted: bool = True,
    *,
    out: tuple[Tensor, ...] | list[Tensor] | None = None,
The handle_composite_ops pass iterates over the FX graph and uses this dictionary:
                if output_size == 1 or output_size == (1,) or output_size == [1]:
                    with graph.inserting_after(node):
                        mean_node = graph.call_function(
                            torch.mean,
                            args=(node.args[0],),
                            kwargs={"dim": [-1], "keepdim": True},
                        )
                        node.replace_all_uses_with(mean_node)
                        graph.erase_node(node)
                        modified = True
            elif isinstance(target_module, torch.nn.AdaptiveAvgPool2d):
                output_size = target_module.output_size
                if output_size == 1 or output_size == (1, 1) or output_size == [1, 1]:
                    with graph.inserting_after(node):
                        mean_node = graph.call_function(
                            torch.mean,
                            args=(node.args[0],),
                            kwargs={"dim": [-2, -1], "keepdim": True},
                        )
                        node.replace_all_uses_with(mean_node)
                        graph.erase_node(node)
                        modified = True

    if modified:
        gm.recompile()
There are three replacement categories:
- Single-output function replacements (
call_functionnodes): The value is a function. The node'stargetis swapped directly (e.g.,torch.nn.functional.gelu→composite_gelu). - Multi-output function replacements (
call_functionnodes): The value is adictmappingfrozensets of output indices to composite functions.handle_composite_opsinspects which outputs are actually consumed and selects the matching variant (e.g.,torch.topk). - Module replacements (
call_modulenodes): A replacement function (e.g.,replace_layer_norm_module) creates newget_attrnodes for the module's parameters and replaces thecall_modulenode with acall_functionnode targeting the composite function.
How to Add a New Composite Op
-
Define the composite function in
python_package/tt_torch/composite_ops.pyusingStableHLOCompositeBuilder:def composite_my_op(input: Tensor, param: float) -> Tensor: attr = {"param": param} builder = StableHLOCompositeBuilder(name="tenstorrent.my_op", attr=attr) input = builder.mark_inputs(input) output = torch.nn.functional.my_op(input, param) output = builder.mark_outputs(output) return output -
Add to the
replacementsdictionary:replacements = { ... torch.nn.functional.my_op: composite_my_op, }For ops that return multiple outputs (e.g. a tuple of tensors), define one composite function per output combination and map to a
dictkeyed byfrozensetof output indices instead:# One variant per combination of outputs the caller might use def composite_my_op(input, k): # both outputs ... def composite_my_op_first(input, k): # only first output ... def composite_my_op_second(input, k): # only second output ... replacements = { ... torch.my_op: { frozenset({0, 1}): composite_my_op, # both outputs used frozenset({0}): composite_my_op_first, # only first output used frozenset({1}): composite_my_op_second, # only second output used }, }handle_composite_opsautomatically detects the dict form, inspects which outputs are actually consumed in the graph and selects the matching variant. Seetorch.topkincomposite_ops.pyfor a complete example.
[!IMPORTANT] If the composite op you're adding has an equivalent form as a tensor method (for example:
torch.topk(input, k, ...)can also be written asinput.topk(k, ...)), then you should also add an entry for that function in themethod_name_to_functiondictionary.
-
For
nn.Moduletypes, write areplace_<op>_modulefunction that:- Extracts parameters from the module instance
- Creates
get_attrnodes for module weights/biases - Replaces the
call_modulenode with acall_functionnode - See
replace_layer_norm_modulein composite_ops.py for a complete example.
-
Write tests in
tests/torch/ops/test_composite_ops.py:@pytest.mark.single_device def test_patched_my_op(request): class MyModel(torch.nn.Module): def forward(self, x): return torch.nn.functional.my_op(x, param=0.5) options = {"tt_enable_composite_ops": True} input = torch.randn(32, 32) run_graph_test( MyModel(), [input], comparison_config=ComparisonConfig(), framework=Framework.TORCH, torch_options=options, ) -
Ensure TT-MLIR has a handler for the composite name (
tenstorrent.my_op). The composite will only be lowered to an optimized implementation if theStableHLOLegalizeCompositePassin TT-MLIR recognizes it.
Torch FX Fusing
How It Works
Torch FX fusing uses PyTorch's replace_pattern_with_filters API, which performs subgraph isomorphism matching on the FX graph. You define two functions:
pattern: A function that constructs the subgraph you want to find. When traced, it becomes a template that the matcher searches for in the model's FX graph.replacement: A function with the same signature that constructs the replacement subgraph.
The matcher finds all occurrences of the pattern subgraph and substitutes them with the replacement. An optional match_filter function can inspect each match and decide whether to accept or reject it (e.g., based on tensor shapes or hardware constraints).
The FusionProvider Framework
All fusion providers inherit from the FusionProvider base class.
class FusionProvider(ABC):
    """Base class for all fusion pattern providers.
    Subclasses are automatically registered via __init_subclass__."""

    _registered_providers: List[Type["FusionProvider"]] = []

    def __init_subclass__(cls, **kwargs):
        super().__init_subclass__(**kwargs)
        FusionProvider._registered_providers.append(cls)

    @property
    @abstractmethod
    def name(self) -> str: ...

    @staticmethod
    @abstractmethod
    def pattern(*args, **kwargs) -> Tensor: ...

    @staticmethod
    @abstractmethod
    def replacement(*args, **kwargs) -> Tensor: ...

    def get_patterns(self) -> List[tuple]: ...
Key points:
_registered_providerscollects all subclasses automatically via__init_subclass__- Subclasses must implement
name,pattern, andreplacement - Override
match_filterfor a single filter, orget_match_filtersfor multiple filters - Override
get_patternsto return multiple(pattern, replacement)pairs when a provider needs to match more than one pattern variant replace_pattern()(see full source) callsreplace_pattern_with_filterswith the provider's pattern, replacement, and filters
The run_fusion_passes function in passes.py iterates over all registered providers and applies them:
from ttxla_tools.logging import logger


def rewrite_adaptive_avgpool_to_mean(gm: torch.fx.GraphModule) -> torch.fx.GraphModule:
    """
    Rewrite call_module nodes targeting AdaptiveAvgPool1d/2d with output_size=1/(1,1)
    to use torch.mean instead.

    This works around an XLA + FunctionalTensorMode incompatibility where inplace_view
    ops (aten.as_strided_ inside adaptive pooling) are re-executed under no_dispatch()
    for metadata fixup, causing dispatch to XLA's kernel on wrapper subclass tensors
    that XLA can't handle.
    """
    graph = gm.graph
    modified = False

    for node in list(graph.nodes):
        if node.op == "call_module" and isinstance(node.target, str):
            target_module = gm.get_submodule(node.target)
Example: RMSNormFusionProvider
The RMSNormFusionProvider detects two common RMSNorm pattern variants (the Llama variant where the cast happens before the weight multiply, and the GPT-OSS variant where the cast happens after) and replaces both with torch.nn.functional.rms_norm. It uses get_patterns to declare both variants. View full source
The pattern and replacement methods define what to match and what to substitute:
        return "rms_norm_fusion"

    @staticmethod
    def pattern(hidden_states: Tensor, weight: Tensor, eps: float, dtype) -> Tensor:
        """
        Llama variant: cast happens before multiply with weight.

        Matches: weight * hidden_states.to(input_dtype)

        Note:
            Uses method calls (.add(), .mul()) instead of operators (+, *)
            because dynamo traces tensor operations as call_method, not call_function.

            The dtype parameter allows matching any dtype variant, it becomes a
            wildcard in the pattern graph that matches any value.
        """
        hidden_fp32 = hidden_states.to(torch.float32)
        variance = hidden_fp32.pow(2).mean(-1, keepdim=True)
        variance_eps = variance.add(eps)
        rsqrt_var = torch.rsqrt(variance_eps)
        hidden_normalized = hidden_fp32.mul(rsqrt_var)
        hidden_cast = hidden_normalized.to(dtype)
        return weight.mul(hidden_cast)

    @staticmethod
    def pattern_cast_after_mul(
        hidden_states: Tensor, weight: Tensor, eps: float, dtype
    ) -> Tensor:
        """
        GPT-OSS variant: cast happens after multiply with weight.

        Matches: (weight * hidden_states).to(input_dtype)
        """
        hidden_fp32 = hidden_states.to(torch.float32)
        variance = hidden_fp32.pow(2).mean(-1, keepdim=True)
        variance_eps = variance.add(eps)
        rsqrt_var = torch.rsqrt(variance_eps)
        hidden_normalized = hidden_fp32.mul(rsqrt_var)
        result = weight.mul(hidden_normalized)
        return result.to(dtype)

    @staticmethod
    def replacement(hidden_states: Tensor, weight: Tensor, eps: float, dtype) -> Tensor:
        """Shared replacement for both RMS norm pattern variants."""
        return torch.nn.functional.rms_norm(
            hidden_states, normalized_shape=weight.shape, weight=weight, eps=eps
        )
Notable details:
.add()/.mul()instead of+/*: Dynamo traces tensor operations ascall_methodnodes, notcall_function. The pattern must match the traced form.dtypeparameter as wildcard: Includingdtypeas a parameter makes it match any value in that position, so the pattern works regardless of the cast target dtype.
The get_patterns override declares both variants with the shared replacement:
def get_patterns(self) -> List[tuple]:
    return [
        (self.pattern, self.replacement),
        (self.pattern_cast_after_mul, self.replacement),
    ]
The optional match_filter inspects each match and can reject it based on hardware constraints:
This filter uses node.meta["example_value"] to inspect tensor shapes at match time, skipping fusion when the weight dimension exceeds what the hardware currently supports.
How to Add a New Fusion Pattern
-
Identify the pattern in the FX graph. Use
torch.compilewith a print/debug backend, or callgm.print_readable()to inspect the traced graph as readable Python code and find the multi-op sequence you want to fuse. -
Create a
FusionProvidersubclass inpython_package/tt_torch/fusion_providers.py:class MyOpFusionProvider(FusionProvider): @property def name(self) -> str: return "my_op_fusion" @staticmethod def pattern(x: Tensor, ...) -> Tensor: # Reproduce the exact sequence of ops from the FX graph ... @staticmethod def replacement(x: Tensor, ...) -> Tensor: # Replace with a single torch op ... -
Implement
pattern: Write a function that reproduces the exact subgraph you want to match. Use.add(),.mul(), etc. instead of operators. Parameters that should match any value act as wildcards. -
Implement
replacement: Write a function with the same signature that produces the desired replacement. This is typically a single torch op liketorch.nn.functional.rms_norm. -
Optionally implement
match_filter: If the pattern should only match under certain conditions (tensor shapes, dtypes, etc.), overridematch_filterto inspectmatch.nodes_mapand returnFalsefor invalid matches. -
For multiple pattern variants, override
get_patternsinstead of defining a singlepattern:def get_patterns(self): return [ (self.pattern, self.replacement), (self.pattern_variant_b, self.replacement), ]The base class
replace_patternwill iterate over all pairs automatically. -
Write a test in
tests/torch/ops/test_fusion_ops.py:@pytest.mark.single_device @pytest.mark.push def test_my_op_fusion(request): options = { "tt_enable_torch_fx_fusion_pass": True, "tt_enable_composite_ops": True, } model = MyModel() input_tensor = torch.randn(1, 32, 32) run_graph_test( model, [input_tensor], comparison_config=ComparisonConfig(), framework=Framework.TORCH, torch_options=options, request=request, )
Tips and Pitfalls
- Use method calls, not operators. In the pattern function, always use
.add(),.mul(),.sub(),.div()instead of+,*,-,/. Dynamo traces these differently. - Fusion runs before composites. The pipeline runs fusion first, then composite wrapping. This means your fused replacement op (e.g.,
rms_norm) can then be picked up by the composite system. - Test with and without fusion. Verify your fusion produces numerically correct results by comparing against the unfused model.
- Inspect the FX graph. To debug pattern matching issues, call
gm.print_readable()before and afterrun_fusion_passes()in the pipeline. This outputs the graph as readable Python code (see PyTorch docs).
MLIR Fusing (Advanced)
TT-MLIR also supports fusing at the MLIR level, as an alternative to the Torch FX + Composites approach described above. The two approaches have different trade-offs:
| Torch FX + Composites | MLIR Fusing | |
|---|---|---|
| Advantages | Easier to write and debug (Python-based pattern matching), lower barrier to entry | Agreed-upon best location for fusions to live long-term. Has better context about hardware-specific optimizations |
| Limitations | All torch-fused operations must be wrapped inside a composite op and legalized in tt-mlir to prevent decomposition during torch_xla lowering | Requires MLIR pattern matching syntax, which is harder to write and debug. Higher barrier to entry for new contributors |
In addition to the Torch FX level fusing described above, TT-MLIR has its own pattern matching and fusion passes at the MLIR level. These operate on the TTIR and TTNN dialects after StableHLO conversion.
Key MLIR fusing components (in the tt-mlir repository):
- Canonicalizers: Simplify and normalize MLIR operations (e.g., folding constants, simplifying identity ops)
- TTIRFusing: Fuses patterns at the TTIR dialect level
- TTNNFusing: Fuses patterns at the TTNN dialect level, closer to hardware
- Pattern rewriters: Use the MLIR
PatternRewriterinfrastructure for subgraph matching and replacement
For more on MLIR pattern rewriting, see the MLIR Pattern Rewriter documentation.
Model Auto-Discovery Tests
Overview
- What: A pytest-based runner that auto-discovers Torch models from
tt-forge-modelsand generates tests for inference and training across parallelism modes. - Why: Standardize model testing, reduce bespoke tests in repos, and scale coverage as models are added or updated.
- Scope: Discovers
loader.pyunder<model>/pytorch/inthird_party/tt_forge_models, queries variants, and runs each combination of:- Run mode:
inference,training - Parallelism:
single_device,data_parallel,tensor_parallel
- Run mode:
Note: Discovery currently targets PyTorch models only. JAX model auto-discovery is planned.
Prerequisites
- A working TT-XLA development environment, built and ready to run tests, with
pytestinstalled. third_party/tt_forge_modelsgit submodule initialized and up to date:
git submodule update --init --recursive third_party/tt_forge_models
- Device availability matching your chosen parallelism mode (e.g., multiple devices for data/tensor parallel).
- Optional internet access for per-model pip installs during test execution.
- env-var
IRD_LF_CACHEset to point to large file cache / webserver for s3 bucket mirror. Reach out to team for details.
Quick start / commonly used commands
Warning: Since the number of models and variants supported here is high (1000+), it is a good idea to run with --collect-only first to see what will be discovered/collected before running non-targeted pytest commands locally.
Also, running the full matrix can collect thousands of tests and may install per-model Python packages during execution. Prefer targeted runs locally using -m, -k, or an exact node id.
Tip: Use -q --collect-only to list tests with full path shown, remove --collect-only and use -vv when running.
- List all tests without running:
pytest --collect-only -q tests/runner/test_models.py |& tee collect.log
- List only tensor-parallel expected-passing on
n300-llmbox(remove--collect-onlyto run):
pytest --collect-only -q tests/runner/test_models.py -m "tensor_parallel and expected_passing and n300_llmbox" --arch n300-llmbox |& tee tests.log
- Run a specific collected test node id exactly:
pytest -vv tests/runner/test_models.py::test_all_models[llama/sequence_classification/pytorch-llama_3_2_1b-single_device-inference] |& tee test.log
- Validate test_config files for typos, model name changes, useful when making updates:
pytest -svv --validate-test-config tests/runner/test_models.py |& tee validate.log
- List all expected passing llama inference tests for n150 (using substring
-kand markers with-m):
pytest -q --collect-only -k "llama" tests/runner/test_models.py -m "n150 and expected_passing and inference" |& tee tests.log

tests/runner/test_models.py::test_all_models[deepcogito/pytorch-v1_preview_llama_3b-single_device-inference]
tests/runner/test_models.py::test_all_models[huggyllama/pytorch-llama_7b-single_device-inference]
tests/runner/test_models.py::test_all_models[llama/sequence_classification/pytorch-llama_3_8b_instruct-single_device-inference]
tests/runner/test_models.py::test_all_models[llama/sequence_classification/pytorch-llama_3_1_8b-single_device-inference]
tests/runner/test_models.py::test_all_models[llama/causal_lm/pytorch-llama_3_8b-single_device-inference]
tests/runner/test_models.py::test_all_models[llama/causal_lm/pytorch-llama_3_8b_instruct-single_device-inference]
tests/runner/test_models.py::test_all_models[llama/causal_lm/pytorch-llama_3_1_8b-single_device-inference]
<snip>
21/3048 tests collected (3027 deselected) in 3.53s
How discovery and parametrization work
- The runner scans
third_party/tt_forge_models/**/pytorch/loader.py(the git submodule) and importsModelLoaderto callquery_available_variants(). - For every discovered variant, the runner generates tests across run modes and parallelism.
- Implementation highlights:
- Discovery and IDs:
tests/runner/test_utils.py(setup_test_discovery,discover_loader_paths,create_test_entries,create_test_id_generator) - Main test:
tests/runner/test_models.py - Config loading/validation:
tests/runner/test_config/config_loader.py(merges YAML into Python with validation)
- Discovery and IDs:
Test IDs and filtering
- Test ID format:
<relative_model_path>-<variant_name>-<parallelism>-<run_mode> - Examples:
squeezebert/pytorch-squeezebert-mnli-single_device-inference...-data_parallel-training
- Filter by substring with
-kor by markers with-m:
pytest -q -k "qwen_2_5_vl/pytorch-3b_instruct" tests/runner/test_models.py
pytest -q -m "training and tensor_parallel" tests/runner/test_models.py
Take a look at model-test-passing.json and related .json files inside .github/workflows/test-matrix-presets for seeing how filtering works for CI jobs.
Parallelism modes
- single_device: Standard execution on one device.
- data_parallel: Inputs are automatically batched to
xr.global_runtime_device_count(); shard spec inferred on batch dim 0. - tensor_parallel: Mesh derived from
loader.get_mesh_config(num_devices); execution sharded by model dimension.
Per-model requirements
-
If a model provides
requirements.txtnext to itsloader.py, the runner will:- Freeze the current environment
- Install those requirements (and optional
requirements.nodeps.txtwith--no-deps) - Run tests
- Uninstall newly added packages and restore version changes
-
Environment toggles:
TT_XLA_DISABLE_MODEL_REQS=1to disable install/uninstall managementTT_XLA_REQS_DEBUG=1to print pip operations for debugging
Test configuration and statuses
- Central configuration is authored as YAML in
tests/runner/test_config/*and loaded/validated bytests/runner/test_config/config_loader.py(merged into Python at runtime). - Example:
tests/runner/test_config/test_config_inference_single_device.yamlfor all single device inference test tagging, andtests/runner/test_config/test_config_inference_data_parallel.yamlfor data parallel inference test tagging. - Each entry is keyed by the collected test ID and can specify:
- Status:
EXPECTED_PASSING,KNOWN_FAILURE_XFAIL,NOT_SUPPORTED_SKIP,UNSPECIFIED,EXCLUDE_MODEL - Comparators:
required_pcc,assert_pcc,assert_allclose,allclose_rtol,allclose_atol - Metadata:
bringup_status,reason, custommarkers(e.g.,push,nightly) - Architecture scoping:
supported_archsused for filtering by CI job and optionalarch_overridesused if test_config entries need to be modified based on arch.
- Status:
YAML to Python loading and validation
- The YAML files in
tests/runner/test_config/*are the single source of truth. At runtime,tests/runner/test_config/config_loader.py:- Loads and merges all YAML fragments into a single Python dictionary keyed by collected test IDs
- Normalizes enum-like values (accepts both names like
EXPECTED_PASSINGand values likeexpected_passing) - Applies
--arch <archname>-specificarch_overrideswhen provided - Validates field names/types and raises helpful errors on typos or invalid values
- Uses
ruamel.yamlfor parsing, which will flag duplicate mapping keys and detect duplicate test entries both within a single YAML file and across multiple YAML files. Duplicates cause validation errors with clear messages.
Model status and bringup_status guidance
Use tests/runner/test_config/* to declare intent for each collected test ID. Typical fields:
-
status(fromModelTestStatus) controls filtering of tests in CI:EXPECTED_PASSING: Test is green and should run in Nightly CI. Optionally set thresholds.KNOWN_FAILURE_XFAIL: Known failure that should xfail; includereasonandbringup_statusto set them statically otherwise will attempt to be set dynamically at runtime.NOT_SUPPORTED_SKIP: Skip on this architecture or generally unsupported; providereasonand (optionally)bringup_status.UNSPECIFIED: Default for new tests; runs in Experimental Nightly until triaged.EXCLUDE_MODEL: Deselect from auto-run entirely (rare; use for temporary exclusions).
-
bringup_status(fromBringupStatus) summarizes current health for Superset dashboard reporting:PASSED(set automatically on pass),INCORRECT_RESULT(e.g., PCC mismatch),FAILED_FE_COMPILATION(frontend compile error),FAILED_TTMLIR_COMPILATION(tt-mlir compile error),FAILED_RUNTIME(runtime crash),NOT_STARTED,UNKNOWN.
-
reason: Short human-readable context, ideally with a link to a tracking issue. -
Comparator controls: prefer
required_pcc; useassert_pcc=Falsesparingly as a temporary measure.
Examples
- Passing with a tuned PCC threshold if reasonable / understood decrease:
"resnet/pytorch-resnet_50_hf-single_device-inference": {
  "status": ModelTestStatus.EXPECTED_PASSING,
  "required_pcc": 0.98,
}
- Known compile failure (xfail) with issue link:
"clip/pytorch-openai/clip-vit-base-patch32-single_device-inference": {
  "status": ModelTestStatus.KNOWN_FAILURE_XFAIL,
  "bringup_status": BringupStatus.FAILED_TTMLIR_COMPILATION,
  "reason": "Error Message - Github issue link",
}
- If minor unexpected PCC mismatch, open ticket, decrease threshold and set bringup_status/reason as:
"wide_resnet/pytorch-wide_resnet101_2-single_device-inference": {
  "status": ModelTestStatus.EXPECTED_PASSING,
  "required_pcc": 0.96,
  "bringup_status": BringupStatus.INCORRECT_RESULT,
  "reason": "PCC regression after consteval changes - Github Issue Link",
}
- If severe unexpected PCC mismatch, open ticket, disable pcc check and set bringup_status/reason as:
"gpt_neo/causal_lm/pytorch-gpt_neo_2_7B-single_device-inference": {
  "status": ModelTestStatus.EXPECTED_PASSING,
  "assert_pcc": False,
  "bringup_status": BringupStatus.INCORRECT_RESULT,
  "reason": "AssertionError: PCC comparison failed. Calculated: pcc=-1.0000001192092896. Required: pcc=0.99 - Github Issue Link",
}
- Architecture-specific overrides (e.g., pcc thresholds, status, etc):
"qwen_3/embedding/pytorch-embedding_8b-single_device-inference": {
    "status": ModelTestStatus.EXPECTED_PASSING,
    "arch_overrides": {
        "n150": {
            "status": ModelTestStatus.NOT_SUPPORTED_SKIP,
            "reason": "Too large for single chip",
            "bringup_status": BringupStatus.FAILED_RUNTIME,
        },
    },
},
Targeting architectures
- Use
--arch {n150,p150,n300,n300-llmbox}on pytest command line to enablearch_overridesresolution in config in case there are specific overrides (like PCC requirements, checking enablement, tagging) per arch. - Tests are also marked with supported arch markers (or defaults), so you can select subsets using
-m, example:
pytest -q -m n300 --arch n300 tests/runner/test_models.py
pytest -q -m n300_llmbox --arch n300-llmbox tests/runner/test_models.py
Placeholder models (report-only)
- Placeholder models are declared in YAML at
tests/runner/test_config/test_config_placeholders.yamland list important customerModelGroup.REDmodels not yet merged, typically marked withBringupStatus.NOT_STARTED. These entries are loaded using the same config loader as other YAML files. tests/runner/test_models.py::test_placeholder_modelsemits report entries with theplaceholdermarker; used for reporting on Superset dashboard and run in tt-xla Nightly CI (typically viamodel-test-xfail.json).- Be sure to remove the placeholder at the same time the real model is added to avoid duplicate reports.
CI setup
- Push/PR: A small, fast subset runs on each pull request (e.g., tests marked
push). This provides quick signal without large queues. - Nightly: The broad model matrix (inference/training across supported parallelism) runs nightly and reports to the Superset dashboard. Tests are selected via markers and
tests/runner/test_config/*statuses/arch tags likeModelTestStatus.EXPECTED_PASSING - Experimental nightly: New or experimental models not yet promoted/tagged in
tests/runner/test_config/*(typicallyunspecified) run separately. These do not report to Superset until promoted with proper status/markers.
Adding a new model to run in Nightly CI
It is not difficult, but involves potentially 2 projects (tt-xla and tt-forge-models). If model is already added to tt-forge-models and uplifted to tt-xla then skip steps 1-4.
- In
tt-forge-models/<model>/pytorch/loader.py, implement aModelLoaderif doesn't already exist, exposing:query_available_variants()andget_model_info(variant=...)load_model(...)andload_inputs(...)load_shard_spec(...)(if needed) andget_mesh_config(num_devices)(for tensor parallel)
- Optionally add
requirements.txt(andrequirements.nodeps.txt) next toloader.pyfor per-model dependencies. - Contribute the model upstream: open a PR in the
tt-forge-modelsrepository and land it (seett-forge-modelsrepo: https://github.com/tenstorrent/tt-forge-models). - Uplift
third_party/tt_forge_modelssubmodule intt-xlato the merged commit so the loader is discoverable:- Update the submodule and commit the pointer:
git submodule update --remote third_party/tt_forge_models
git add third_party/tt_forge_models
git commit -m "Uplift tt-forge-models submodule to <version> to include <model>"
- Verify the test appears via
--collect-onlyand run desired flavor locally if needed. - Add or update the corresponding entry in
tests/runner/test_config/*to set status/thresholds/markers/arch support so that the model test is run in tt-xla Nightly CI. Look at existing tests for reference. - Remove any corresponding placeholder entry from
PLACEHOLDER_MODELSintest_config_placeholders.yamlif it exists. - Locally run
pytest -q --validate-test-config tests/runner/test_models.pyto validatetests/runner/test_config/*updates (on-PR jobs run it too). - Open a PR in
tt-xlafor changes, consider running full set of expected passing models on CI to qualifytt_forge_modelsuplift (if it is risky), and land the PR intt-xlamain when confident in changes.
Troubleshooting
- Discovery/import errors show as:
Cannot import path: <loader.py>: <error>; add per-model requirements or setTT_XLA_DISABLE_MODEL_REQS=1to isolate issues. - Runtime/compilation failures are recorded with a bring-up status and reason in test properties; check the test report’s
tagsanderror_message. - Some models may be temporarily excluded from discovery; see logs printed during collection.
- Use
-vvand--collect-onlyfor detailed collection/ID debugging.
Future enhancements
- Expand auto-discovery beyond PyTorch to include JAX models
- Automate updates of
tests/runner/test_config/*potentially based on results of Nightly CI, automatic promotion of tests from Experimental Nightly to stable Nightly. - Broader usability improvements and workflow polish tracked in issue #1307
Reference
tests/runner/test_models.py: main parametrized pytest runnertests/runner/test_utils.py: discovery, IDs,DynamicTorchModelTestertests/runner/requirements.py: per-model requirements context managertests/runner/conftest.py: config attachment, markers,--arch, config validationtests/runner/test_config/*.yaml: YAML test config files (source of truth)tests/runner/test_config/config_loader.py: loads/merges/validates YAML into Python at runtimethird_party/tt_forge_models/config.py:Parallelismand model metadata
Code Generation Guide
Convert JAX or PyTorch models into standalone Python or C++ source code targeting Tenstorrent hardware.
Quick Reference
| Framework | Backend Option | Output | Standalone? |
|---|---|---|---|
| PyTorch/JAX | codegen_py | Python (.py) | No (requires TT-XLA build) |
| PyTorch/JAX | codegen_cpp | C++ (.cpp, .h) | Yes |
New to code generation? Start with the Python Code Generation Tutorial for a hands-on walkthrough.
Overview
Code generation (powered by TT-Alchemist) transforms your model into human-readable source code that directly calls the TT-NN library, enabling:
- Customization - Modify generated code to add optimizations or integrate with existing infrastructure
- Model Portability - Extract models into standalone code deployable without the full framework stack
- Inspection & Debugging - Examine generated source to understand exact operations performed
- Education - Study how high-level framework operations translate to TT-NN library calls
Technical Note: Internally referred to as TT-Alchemist, EmitPy (Python generation), or EmitC (C++ generation).
Basic Usage
PyTorch
Configure code generation options before compiling your model:
import torch
import torch_xla.core.xla_model as xm

# Configure code generation
options = {
    "backend": "codegen_py",              # Or "codegen_cpp" for C++
    "export_path": "torch_codegen_output" # Output directory
}
torch_xla.set_custom_compile_options(options)

# Standard PyTorch workflow
device = xm.xla_device()
model = YourModel()
model.compile(backend="tt")
model = model.to(device)
x = torch.randn(32, 32).to(device)

# Trigger code generation
output = model(x)
Output location: torch_codegen_output/ directory containing:
ttir.mlir- TTIR intermediate representation*.pyor*.cpp/*.h- Generated source files
JAX
Pass compile options directly to jax.jit():
import jax
from flax import nnx

def forward(graphdef, state, x):
    model = nnx.merge(graphdef, state)
    return model(x)

# JIT compile with code generation
jitted_forward = jax.jit(
    forward,
    compiler_options={
        "backend": "codegen_py",          # Or "codegen_cpp" for C++
        "export_path": "jax_codegen_output"
    }
)

# Trigger code generation
result = jitted_forward(graphdef, state, x)
Output location: jax_codegen_output/ directory containing:
irs/- various intermediate representations for debugging*.pyor*.cpp/*.h- Generated source filestensors/- exported model input and parameter tensors
Configuration Options
Codegen Options
Use codegen_py to generate Python output and codegen_cpp to generate C++ output. Both entrypoints share the same API and accept the following options.
| Option | Type | Description |
|---|---|---|
export_path | string | Directory for generated code (created if doesn't exist) |
export_tensors | bool | Whether to export model input and parameter tensors to disk under export_path/tensors directory (True by default) |
compiler_options | dict | Key-value pairs of compiler options (e.g. optimization_level=2) |
Note If 'export_tensors' is set to False, model input and parameter tensors won't be exported to disk, and instead ttnn.ones will be loaded into model inputs and parameters.
Example Configurations
Python Generation:
codegen_py(
    forward, graphdef, state, x, export_path="generated_python", export_tensors=False
)
C++ Generation:
codegen_cpp(
    forward, graphdef, state, x, export_path="generated_cpp"
)
Generated Output
Directory Structure
After code generation completes, your export_path directory contains:
<export_path>/
├── irs/          # VHLO, SHLO, TTIR, TTNN intermediate representations (debugging)
├── main.py/cpp        # Generated Python/C++ code
├── run                # Execution script
└── tensors/     # Directory with exported tensors if specified by export_tensors option
File Descriptions
Intermediate representations - Various levels of model intermediate representation
irs/vhlo*.mlir- High-level intermediate representation after initial Jax/Pytorch compilationirs/shlo*.mlir- StableHLO intermediate representation (framework-level tensor operations)irs/ttir*.mlir- TT Intermediate Representation (hardware-agnostic tensor IR)irs/ttnn*.mlir- TTNN dialect (backend-specific IR modeling the TT-NN API)
Generated Python (*.py) - Python Implementation
- Direct TT-NN API calls
- Human-readable and modifiable
- Not standalone - requires TT-XLA build to execute
- Includes
runscript for execution
Generated C++ (*.cpp, *.h) - C++ Implementation
- Direct TT-NN API calls
- Human-readable and modifiable
- Fully standalone - only requires TT-NN library
- Can be integrated into existing C++ projects
tensors/ - Serialized model inputs and parameters (created when export_tensors: True)
- Used by the generated code to load real model inputs and weights instead of random values
Code Generation Behavior
Expected Process Flow
- ✅ Model compiles through TT-XLA pipeline
- ✅ Code generation writes files to
export_path
Verifying Success
Check that code generation succeeded:
ls -la <export_path>/
You should see:
- ✅
export_pathdirectory structure like here - ✅ Generated source files (
.pyor.cpp/.h) - ✅ File sizes are non-zero
- ✅ (Python only) Executable
runscript exists
Use Cases
1. Custom Optimization
Scenario: Hand-tune generated code for specific workloads
Benefits:
- Modify operation ordering
- Adjust memory layouts
- Add custom kernel calls
Best for: Performance-critical applications, specialized hardware configurations
2. Model Deployment & Portability
Scenario: Deploy models without the full JAX/PyTorch stack
Benefits:
- Smaller deployment footprint
- Fewer dependencies
- Direct control over execution
Best for: Production environments, edge devices, embedded systems
3. Model Inspection & Debugging
Scenario: Understand what operations your model performs
Benefits:
- Examine exact TT-NN API calls
- Identify performance bottlenecks
- Understand memory access patterns
Best for: Performance optimization, debugging accuracy issues
4. Educational & Research
Scenario: Learn how high-level operations translate to hardware
Benefits:
- Study framework→hardware mapping
- Experiment with low-level optimizations
- Understand compiler transformations
Best for: Learning, research, optimization experiments
Advanced Topics
Alternative: Code Generation via Serialization
Note: Most users should use compile options (documented above). This method is provided for advanced use cases.
You can also invoke code generation by hooking into the serialization infrastructure and running TT-Alchemist directly on the results.
When to use this:
- Custom compilation workflows
- Integration with existing build systems
- Automated pipeline generation
Examples:
- PyTorch: [
examples/pytorch/python/custom_module.py](../../examples/pytorch/codegen/python/custom_module.py - JAX:
examples/jax/python/custom_module.py
Related Documentation
- Python Code Generation Tutorial - Step-by-step hands-on tutorial
- Getting Started Guide - Main TT-XLA setup
- Building from Source - Development setup
Next Steps
- Try the tutorial: Follow the Python Code Generation Tutorial for hands-on experience
- Experiment: Try both
codegen_pyandcodegen_cppbackends - Inspect code: Examine generated code to understand TT-NN API usage
- Customize: Modify generated code to optimize for your use case
- Deploy: Integrate generated C++ code into your applications
Questions or issues? Visit TT-XLA GitHub Issues for support.
Tutorial: Generate Python Code from Your Model
Learn how to convert PyTorch and JAX models into standalone Python code using TT-XLA's code generation feature.
What You'll Learn
By the end of this tutorial, you'll be able to:
- Generate Python code from PyTorch/JAX models using TT-XLA
- Execute the generated code on Tenstorrent hardware
- Inspect and understand the TT-NN API calls in the generated code
Time to complete: ~15 minutes
What is Code Generation?
Code generation (also called "EmitPy" or powered by "TT-Alchemist") transforms your high-level model into human-readable Python source code that directly calls the TT-NN library. This lets you inspect, modify, and deploy models without the full TT-XLA runtime.
For complete conceptual overview and all options, see the Code Generation Guide.
Prerequisites
Before starting, ensure you have:
- Access to Tenstorrent hardware (via IRD or physical device) - jump to Step 1
-
TT-XLA Docker image:
ghcr.io/tenstorrent/tt-xla/tt-xla-ird-ubuntu-24-04:latest- jump to Step 2
Step-by-Step Guide
Step 1: Reserve Hardware and Start Docker Container
Reserve Tenstorrent hardware with the TT-XLA Docker image:
ird reserve --docker-image ghcr.io/tenstorrent/tt-xla/tt-xla-ird-ubuntu-24-04:latest [additional ird options]
Tip: The
[additional ird options]should include your typical IRD configuration like architecture, number of chips, etc.
Step 2: Clone and Setup TT-XLA
Inside your Docker container, clone the repository:
git clone https://github.com/tenstorrent/tt-xla.git
cd tt-xla
Initialize submodules (required for dependencies):
git submodule update --init --recursive
Expected output: Git will download all third-party dependencies.
Step 3: Build TT-XLA
Set up the build environment and compile the project:
# Activate the Python virtual environment
source venv/activate

# Configure the build
cmake -G Ninja -B build

# Build the project (this may take 10-15 minutes)
cmake --build build
Debug Build: Add
-DCMAKE_BUILD_TYPE=Debugto the cmake configure command if you need debug symbols.
Step 4: Run Code Generation Example
Choose your framework and run the example:
PyTorch:
python examples/pytorch/codegen/python/custom_module.py
JAX:
python examples/jax/codegen/python/custom_module.py
What Happens During Code Generation
Both examples configure TT-XLA with these options:
codegen_py(
    forward, graphdef, state, x, export_path="model"
)
where forward is the model’s forward function that TT-XLA will compile and lower to TT-NN ops. In the JAX example, it is defined as:
def forward(graphdef, state, x):
    model = nnx.merge(graphdef, state)
    return model(x)
and graphdef/state come from nnx.split(model), while x is a representative input used to trace/compile the computation.
The process will:
- ✅ Compile your model through the TT-XLA pipeline
- ✅ Generate Python source code in the
model/directory
Generated Files
Check the model/ directory for your generated code:
ls -la model/
You should see:
main.py- Generated Python code with TT-NN API callsrun- Executable shell script to run the generated codetensors/- Directory with exported model input and parameter tensorsirs/- # VHLO, SHLO, TTIR, TTNN intermediate representations (debugging)
Step 5: Generate the optimized code
We can specify different optimization options in order to produce the more performant code. For example, we can supply following set of options to produce the optimized code.
# Any compile options you could specify when executing the model normally can also be used with codegen.
extra_options = {
    "optimization_level": 0,  # Levels 0, 1, and 2 are supported
}

codegen_py(
    forward, graphdef, state, x, export_path="model", compiler_options=extra_options
)
Link to other optimizer options to be added here: TT-XLA Optimizer Docs
Step 6: Exporting model input and parameter tensors
By default, model input and parameter tensors are exported to export_path/tensors/.
If you don't need to dump these tensors, set the codegen_py parameter export_tensors=False. The generated code will use ttnn.ones for input and parameter tensors instead.
codegen_py(
    forward, graphdef, state, x, export_path="model", export_tensors=False
)
Step 7: Execute the Generated Code
Navigate to the model directory and run the execution script:
cd model
./run
What the run Script Does
The script automatically:
- Sets up the Python environment with TT-NN dependencies
- Configures Tenstorrent hardware settings
- Executes the generated Python code
- Displays inference results
Expected output: You should see inference results printed to the console, showing your model running successfully on Tenstorrent hardware.
Next Steps
Now that you've successfully generated and executed code:
Inspect the Generated Code
Open model/main.py to see how your PyTorch/JAX operations map to TT-NN API calls:
cat model/main.py
Look for patterns like:
- Tensor allocation and initialization
- Operation implementations (matrix multiply, activation functions, etc.)
- Memory management and device synchronization
Customize the Generated Code
Try modifying operations in main.py:
- Change tensor shapes or data types
- Add print statements to debug intermediate values
- Optimize memory layouts or operation ordering
Generate C++ Code
Want C++ instead of Python? Change the backend:
# Any compile options you could specify when executing the model normally can also be used with codegen.
extra_options = {
    # "optimization_level": 0,  # Levels 0, 1, and 2 are supported
}

codegen_cpp(
    forward, graphdef, state, x, export_path="model", compiler_options=extra_options
)
The generated C++ code is fully standalone and can be integrated into existing C++ projects.
Generate resnet TTNN code using following example:
Learn More
- Code Generation Guide - Complete reference for all options and use cases
- PyTorch Example Source - Full example code
- JAX Example Source - Full example code
Summary
What you accomplished:
- ✅ Built TT-XLA from source in Docker
- ✅ Generated Python code from a PyTorch/JAX model
- ✅ Executed the generated code on Tenstorrent hardware
- ✅ Learned where to find and inspect the generated code
Key takeaways:
- Code generation creates inspectable implementations
- The process intentionally terminates after generation (current limitation)
- Generated code can be modified and optimized for your use case
Need help? Visit the TT-XLA Issues page or check the Code Generation Guide for more details.
Troubleshooting
Code Generation Fails
Symptom:
ERROR: tt-alchemist generatePython failed
Cause: Code generation process encountered an error
Solutions:
-
Check export path is writable:
mkdir -p <export_path> touch <export_path>/test && rm <export_path>/test -
Verify TTIR was generated:
ls -lh <export_path>/ttir.mlirIf
ttir.mliris missing or empty (0 bytes), compilation failed before code generation. -
Check for compilation errors: Review the full output for errors before the "generatePython failed" message.
-
Try with minimal model: Test with a simple model to isolate the issue:
class MinimalModel(torch.nn.Module):
    def forward(self, x):
        return x + 1
Export Path Not Set
Symptom:
Compile option 'export_path' must be provided when backend is not 'TTNNFlatbuffer'
Cause: The export_path option is missing
Solution: Add export_path to your compiler options:
options = {
    "backend": "codegen_py",
    "export_path": "./output"  # ← Add this
}
Generated Code Execution Fails
Symptom: Errors when running generated Python code via ./run
Possible Causes & Solutions:
-
TT-XLA not built:
cd /path/to/tt-xla cmake --build build -
Hardware not accessible:
tt-smi # Should show your Tenstorrent devices -
Wrong hardware configuration:
- Verify generated code matches your hardware setup
- Check device IDs and chip counts
- Rebuild TT-XLA if hardware configuration changed
-
Missing dependencies:
source venv/activate # Ensure virtual environment is active
Generated C++ Code Won't Compile
Symptom: C++ compilation errors in generated code
Solutions:
-
Check TT-NN headers are available:
find /opt/ttmlir-toolchain -name "ttnn*.h" -
Verify C++ compiler version: Generated code requires C++17 or later
-
Link against TT-NN library: Ensure your build system links the TT-NN library correctly
Building PyTorch XLA from Source
This guide covers building PyTorch and PyTorch-XLA (Tenstorrent fork) from source for development on tt-xla.
Overview
- Build Method: Official PyTorch XLA contributing guide workflow
- PyTorch Version: 2.9.1
- XLA Source: Tenstorrent fork
- Python: 3.12
- Bazel: 7.4.1
- Total Time: ~2-2.5 hours (first build)
Build
The scripts/build_torch_xla.sh script automates the entire process — installing dependencies, cloning repos, building, and integrating into the tt-xla venv. Each step is documented with comments in the script itself.
./scripts/build_torch_xla.sh            # Release build (default)
./scripts/build_torch_xla.sh --debug    # Debug build
Subsequent runs skip builds if the source hasn't changed.
Incremental Rebuilds
After making changes to the torch-xla repo, you can do an incremental build:
# Activate the build venv (not tt-xla venv)
source temp/torch_dev_env/bin/activate

# Go to the torch-xla location
cd temp/pytorch/xla/

# Incremental build
python setup.py develop
For Python-only changes, no rebuild is needed (development mode).
Troubleshooting
_XLAC_cuda_functions Python version mismatch
If you see:
ImportError: Python version mismatch: module was compiled for Python 3.10
Bazel compiled extensions against the system Python instead of 3.12. Fix:
rm -rf /tmp/$USER/bazel_cache
cd temp/pytorch/xla
rm -rf build/
export HERMETIC_PYTHON_VERSION=3.12
python setup.py develop
TTMLIR_TOOLCHAIN_DIR: unbound variable
The tt-xla venv/activate script expects this variable. Either set it before running the build script, or ensure tt-xla is properly set up first.
Tools
This section covers tools available in the TT-XLA project.
Available Tools
- Explorer - Tool for exploring and analyzing models
Explorer
Explorer is an interactive GUI tool from TT-MLIR for visualizing and experimenting with model graphs (including Tenstorrent's MLIR dialects), compiling and executing your model on Tenstorrent hardware.
What is Explorer?
Explorer is a visual debugging and performance analysis tool that allows you to:
- Visualize MLIR graphs: Inspect your model graph with hierarchical visualization
- Compile and execute your model: Compile your model to Tenstorrent hardware and execute it
- Debug performance: Identify bottlenecks and see affects of optimizations on runtime performance
Building with Explorer
Explorer is only available when building TT-XLA from source. It is not included in pre-built wheels. It is disabled by default in TT-XLA. You can enable it by building with the TTXLA_ENABLE_EXPLORER CMake option:
cmake -G Ninja -B build -DCMAKE_BUILD_TYPE=Release -DTTXLA_ENABLE_EXPLORER=ON
cmake --build build
Note: Enabling Explorer also enables Tracy performance tracing (
TTMLIR_ENABLE_PERF_TRACE), which may slow down execution. For production deployments or performance benchmarking, consider building with-DTTXLA_ENABLE_EXPLORER=OFF.
Using Explorer
After building with Explorer enabled, launch the tool by running:
tt-explorer
This will start the interactive GUI for analyzing your model's compilation and execution.
Example graph to try out
module attributes {} {
  func.func @forward(%arg0: tensor<64x128xbf16>, %arg1: tensor<64x128xbf16>, %arg2: tensor<64x128xbf16>, %arg3: tensor<64x128xbf16>) -> tensor<64x128xbf16> {
    %0 = ttir.empty() : tensor<64x128xbf16>
    %1 = "ttir.add"(%arg0, %arg1, %0) : (tensor<64x128xbf16>, tensor<64x128xbf16>, tensor<64x128xbf16>) -> tensor<64x128xbf16>
    %2 = ttir.empty() : tensor<64x128xbf16>
    %3 = "ttir.add"(%arg2, %arg3, %2) : (tensor<64x128xbf16>, tensor<64x128xbf16>, tensor<64x128xbf16>) -> tensor<64x128xbf16>
    %4 = ttir.empty() : tensor<64x128xbf16>
    %5 = "ttir.add"(%1, %3, %4) : (tensor<64x128xbf16>, tensor<64x128xbf16>, tensor<64x128xbf16>) -> tensor<64x128xbf16>
    %6 = ttir.empty() : tensor<64x128xbf16>
    %7 = "ttir.relu"(%5, %6) : (tensor<64x128xbf16>, tensor<64x128xbf16>) -> tensor<64x128xbf16>
    return %7 : tensor<64x128xbf16>
  }
}
Learn More
For detailed documentation on how to use Explorer, including tutorials and advanced features, see the TT-MLIR Explorer Documentation.
Explorer is based on Google's Model Explorer with added support for Tenstorrent hardware compilation and execution.