TT-Explorer
Welcome to the TT-Explorer wiki! TT-Explorer is a visualization and exploration tool included in the TT-MLIR repository. Based on Google’s Model Explorer, TT-Explorer is adapted for use with Tenstorrent’s custom, open-source compiler stack. Using TT-Explorer, you can:
Analyze and inspect models
Visualize models (attributes, performance results)
Explore models across StableHLO (SHLO), TTIR, and TTNN dialects
Interactively debug or experiment with IR-level overrides.
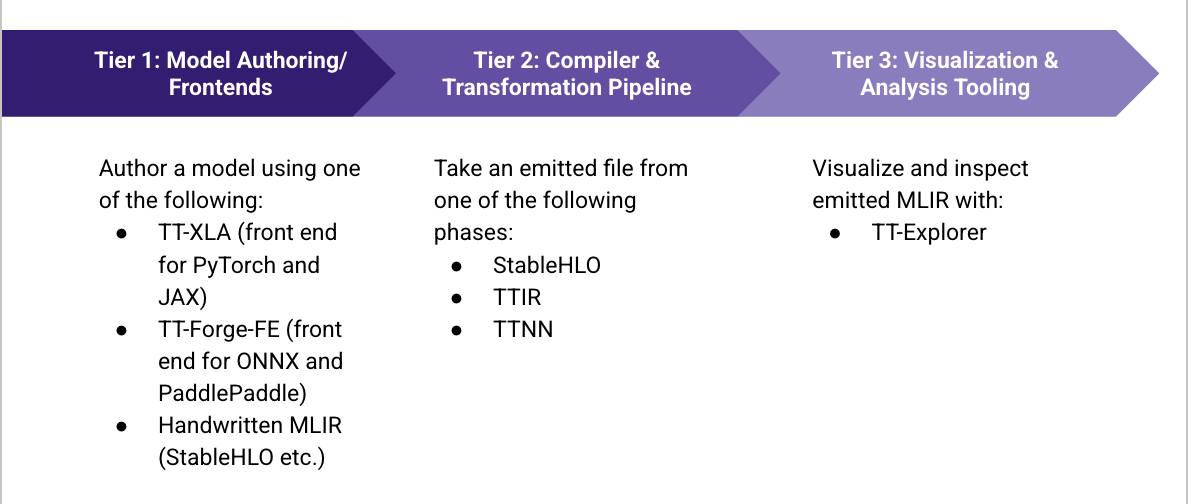
TT-Explorer is for use with TT-MLIR compiler results. It takes emitted MLIR files, converts them to JSON, and displays them. There are three main levels the emitted TT-MLIR file is likely to be from, and all are supported for TT-Explorer:
SHLO - Portability layer between different ML frameworks (like TensorFlow, JAX, and PyTorch) and ML compilers (like XLA and IREE), ensuring compatibility across the ML ecosystem.
TTIR - Mid-level intermediate representation (IR) that introduces hardware concepts like tensor tiling, memory layouts, and op fusion. Maps to hardware capabilities.
TTNN - High-level, PyTorch style ops (for example,
ttnn.conv2d) used for writing and compiling models in a user-friendly format.
Prerequisites
Configure your Tenstorrent hardware
Configure the Tenstorrent software stack
Quick Start
This section explains how to install TT-Explorer. Do the following:
TT-Explorer comes packaged as a tool in the TT-MLIR directory. Clone the TT-MLIR repo:
git clone https://github.com/tenstorrent/tt-mlir.git
Navigate into the tt-mlir directory.
The environment gets installed into a toolchain directory, which is by default set to
/opt/ttmlir-toolchain, but can be overridden by setting the environment variableTTMLIR_TOOLCHAIN_DIR. You need to manually create the toolchain directory as follows:
export TTMLIR_TOOLCHAIN_DIR=/opt/ttmlir-toolchain/
sudo mkdir -p "${TTMLIR_TOOLCHAIN_DIR}"
sudo chown -R "${USER}" "${TTMLIR_TOOLCHAIN_DIR}"
Ensure you do not have a virtual environment activated already before running the following command:
source env/activate
NOTE: These commands can take some time to run. Also, please note that the virtual environment may not show at the end of this step.
In this step, you build the TT-MLIR project. To build so that you can use TT-EXPLORER, the following flags must be included for your build:
-DTT_RUNTIME_ENABLE_PERF_TRACE=ON-DTTMLIR_ENABLE_RUNTIME=ON-DTT_RUNTIME_DEBUG=ON-DTTMLIR_ENABLE_STABLEHLO=ON
The commands are:
source env/activate
cmake -G Ninja -B build \
   -DTT_RUNTIME_ENABLE_PERF_TRACE=ON \
   -DTTMLIR_ENABLE_RUNTIME=ON \
   -DTT_RUNTIME_DEBUG=ON \
   -DTTMLIR_ENABLE_STABLEHLO=ON
Build the
explorertarget in the tt-mlir directory:
cmake --build build -- explorer
Run
tt-explorerin the terminal to start att-explorerinstance. (Refer to the CLI section in the API for specifics)Note:
tt-explorerrequires Pandas in addition to thett-mlirSystem Dependencies.
Ensure the server has started in the
tt-explorershell instance. Check for the following message:Starting Model Explorer server at: http://localhost:8080
Running TT-Explorer CI Tests Locally
This section describes how to run CI tests as well as how to reproduce and debug failing CI tests locally. Make sure you are familiar with how to build and run TT-Explorer before starting this section.
TT-Explorer relies on tests that are present in the test/ directory as well as tests dynamically created through llvm-lit. Below are the steps to replicate the testing procedure seen in CI:
Make sure you’re in the
tt-mlirdirectoryYou need to build the explorer target with
cmake --build build -- explorerRun and save the system descriptor
ttrt query --save-artifactsSave the system variable
export SYSTEM_DESC_PATH=$(pwd)/ttrt-artifacts/system_desc.ttsysRun and generate ttnn + MLIR tests:
cmake --build build -- check-ttmlirSave the relevant test directories:
export TT_EXPLORER_GENERATED_MLIR_TEST_DIRS=$(pwd)/build/test/python/golden/ttnn,$(pwd)/build/test/ttmlir/Silicon/TTNN/n150/perfexport TT_EXPLORER_GENERATED_TTNN_TEST_DIRS=$(pwd)/build/test/python/golden/ttnn
Run the pytest for
tt-explorerwithpytest tools/explorer/test/run_tests.py
As a shell script it looks like this:
# Ensure you are present in the tt-mlir directory
source env/activate

# Build Tests
cmake --build build -- explorer
ttrt query --save-artifacts
export SYSTEM_DESC_PATH=$(pwd)/ttrt-artifacts/system_desc.ttsys
cmake --build build -- check-ttmlir

# Load Tests
export TT_EXPLORER_GENERATED_MLIR_TEST_DIRS=$(pwd)/build/test/python/golden/ttnn,$(pwd)/build/test/ttmlir/Silicon/TTNN/n150/perf
export TT_EXPLORER_GENERATED_TTNN_TEST_DIRS=$(pwd)/build/test/python/golden/ttnn

# Run Tests
pytest tools/explorer/test/run_tests.py